Tuning a bow is not the easiest thing to do for many. Different bows require different techniques. The most important thing to do is establish a chronological order for tuning a bow; our timeline does just that. This timeline can be used with any compound bow to simplify the process while tuning a bow.
Before tuning a bow with our timeline, it is important that all accessories have been installed properly, the arrows that will be used have the correct spine and that the shooter has good archery form. If the shooter and the equipment is ready, then proceed to the “tuning a bow” timeline.
1. Max out your compound bow’s poundage
This is the first step in bow tuning because to make sure the bow is at the manufacturer’s specified measurements, the bow must be at maximum draw weight.
2. Get your compound bow to spec (manufacturer’s specified measurements)
The compound bow’s measurements that we will be looking at are the ATA (axle to axle) measurements and the brace height measurement. The ATA will be measured from the center of the top cam or idler wheel’s axle pin to the center of the bottom cam’s axle pin. Your manufacturer will have a suggested ATA measurement for your bow. If your bow is within 1/8 of an inch or less, you are good to go. If your ATA is greater than an 1/8 of an inch, then you have to adjust your cable(s) and bow string to shorten the ATA.
If the ATA is too short, untwist cable(s) and bow string equally one twist at a time. If your ATA is too long, you will twist the cable(s) and bow string equally on twist at a time. After twisting/untwisting cable(s) and the bow string, reassemble and unpress the bow to measure the changes. If you are working on a solocam bow, you will only have one cable and a bow string that is twice as long as twin cam bows. In this situation, you will have to twist/untwist the bow string two time for every one time you untwist the control cable.
Once you have your bow’s ATA within 1/8 inch of manufacturer’s spec measurement, move on to the next step.
3. Check your bow’s timing
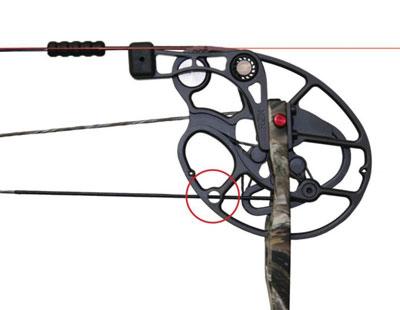
Different bows have different timing marks on their cams. Research what your bow’s timing marks are on the internet or call the manufacturer/pro shop for this info. Once you have this info, check your bow to see if it is set correctly.
Some bows (Mathews), have holes in their cams which the cable should be centered in, while other manufacturers have engraved markings to reference. With a twin cam bow, its a good practice to have a friend confirm that both draw stops are hitting the cables at the same time. Visit our Timing Your Bow page for more info.
Once your compound bow’s timing is set, move to the next step.
4. Yoke tune a solocam bow
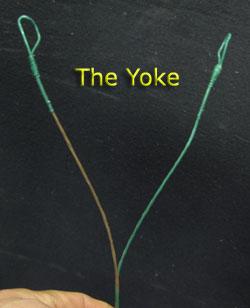 If you have a twin cam bow move on to step 5. If you have a solocam bow, follow these yoke tuning instructions.
Yoke tuning a solocam bow is done to eliminate fishtailing of the arrow due to the bow string not having the proper path to seat itself back into the idler wheel’s groove. When at full draw, with a torque free grip, the bow string should be perfectly inline with the idler wheel. If it is not, follow the instructions on our Yoke Tuning A Compound Bow page to yoke tune your bow. Once yoke tuning is complete, move on to the next step.
5. Paper tune your bow
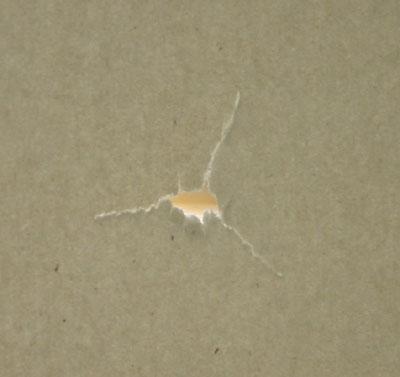 One of the most useful steps in tuning a bow is paper tuning. Paper tuning is the process of getting a “snap shot” of the arrow’s flight at about 8 feet from the archer. The tear the arrow leaves in the paper can tell quite a story. Bad paper tears will indicate either improper accessory setup, improper archery form, or a combination of both. Depending on the rip in the paper, we will have to adjust the center shot adjustment (left to right) of our arrow rest, our knocking point height on the string, or both. Visit our Paper Tuning Your Bow page for more info. Once paper tuning is complete, proceed to walk back tuning.
6. Walk back tune your bow
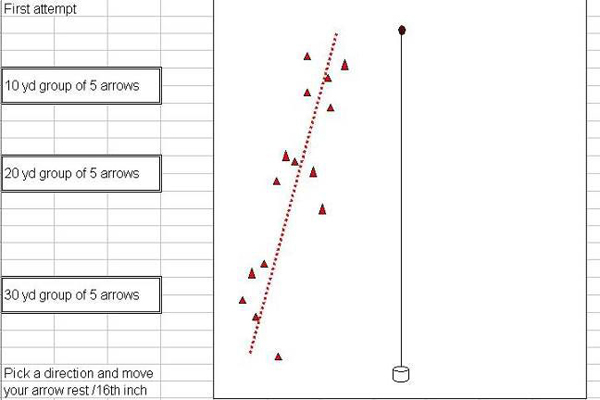 Paper tuning is an indicator of what the needed macro adjustments for our nocking point and arrow rest locations. Walk back tuning is used to micro adjust the left to right location of our arrow rest. When we walk back tune and micro adjust our rest to achieve a perfect up and down arrow drop, our accuracy at longer distances will increase. Visit our Walk Back Tuning page for more info.
7. Adjust your archery sight’s pins
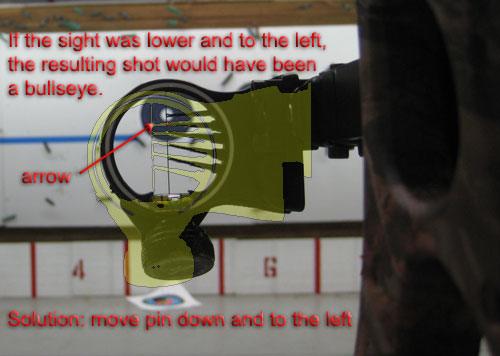 The last step in the tuning a bow timeline for tuning a bow is adjusting our pins. Having a tuned bow doesn’t do any good if you don’t hit what you’re aiming for! Whether by trial and error or with the help from archery software, getting your pins set perfectly is critical for hitting your mark when the time is right. Visit our How To Adjust A Bow Sight page for more info.
If you have gone through steps 1 through 7 of tuning a bow successfully, we have no doubt that your accuracy and success rate in the field will increase exponentially. If you had any difficulty in any one of the steps, please visit one of the many archery forums on the internet for help from the archery community.