In the 1980s, arrow charts were introduced which gave archers an educated guess at which arrow should work with their bow. The charts would have various draw weights on the left and arrow lengths on the top and all the archer would have to do is match up both of their settings and purchase the arrow the chart suggested. Although this was helpful at the time, the arrow chart has become outdated.
The design/technology of compound bows has drastically changed in the last decade and this can be seen in the annually increasing speeds of the bows. You can have two bows which are set at the same draw weight and same draw length, but they each require a different arrow. Why is that? The answer is because each bow has a unique power factor which is calculated using a the IBO speed of the bow and the bow’s specs.
So how do you know what archery arrow will react well with any given bow?
The best answer is to embrace technology and either buy an archery program for your computer or go to a pro shop that uses one. These programs are very advanced and eliminate the guesswork regarding arrow selection.
Below are screenshots from the OnTarget’s “Software for Archers”. This software is an impressive cutting edge program which, when mastered, will aid any archer in achieving the perfect setup. Due to all of this programs features it may be a little intimidating at first, but once learned, it will become your favorite and most used tool when setting up equipment.
How to choose the right arrow with archery arrow software
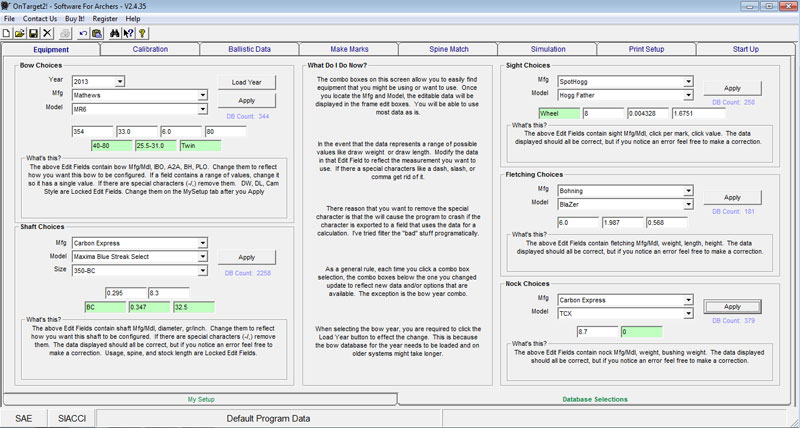
1. Select the equipment you will be using
On the equipment tab, with Database Selections chosen (bottom of the screen), select the equipment that you are going to use. After finding your bow, arrow shaft, fletching choice and nock choice, be sure to click apply in each category’s frame. This will send your information to the next screen that which we will be using, the My Setup page.
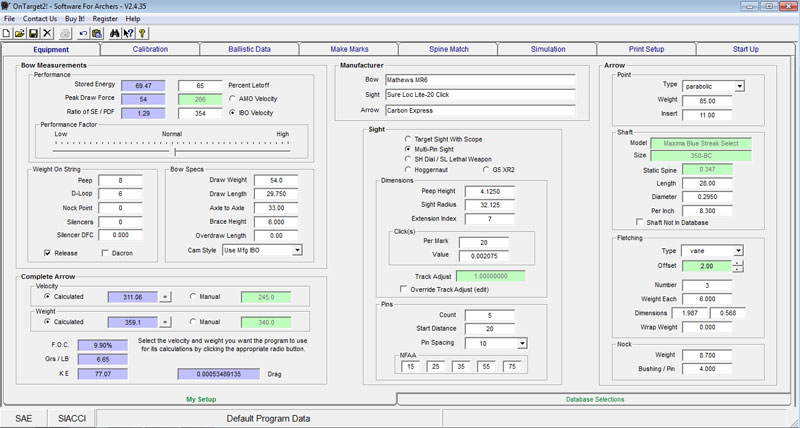
2. Enter the specs for your equipment
After selecting your equipment from the Database Selections page, click the My Setup tab at the bottom of the page. On this page you will enter your own personal specs such as draw weight, draw length, arrow shaft length, fletching weight, etc.. If you are unsure of needed information such as fletching weight or nock weight, you can do a quick internet search and find the information. Once you have input all of your information, now would be a good time to use the “Save User Record” feature. This will allow you to use the “Load User Record” at a later date which will populate all the data that you have input. Once you are finished with the My Setup page, click on the Spine Match page.
3. Check the spine reading
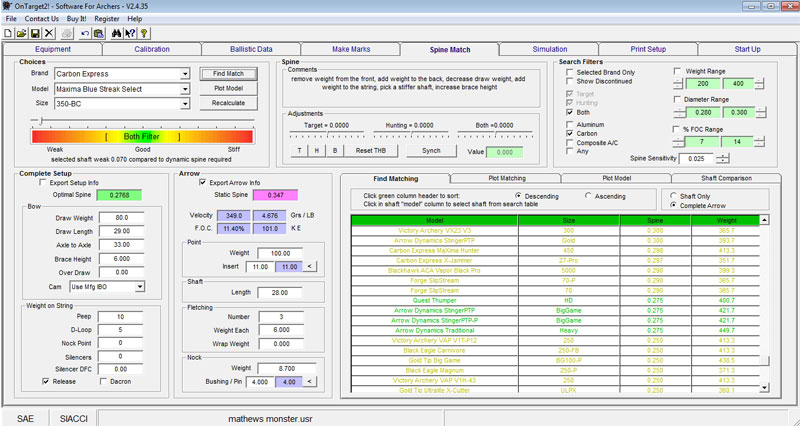
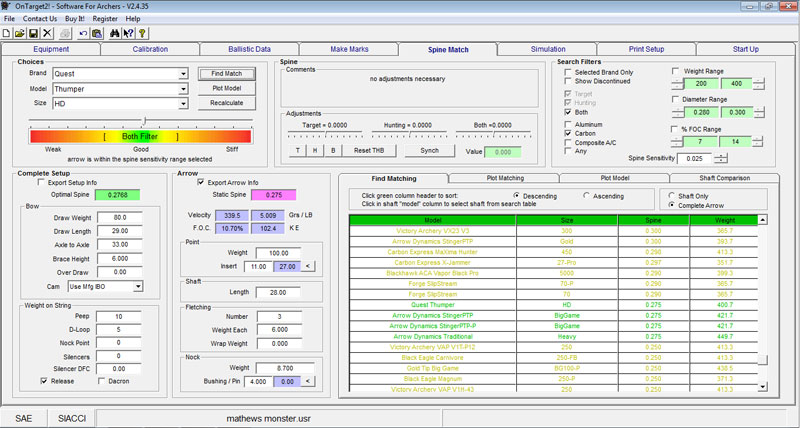
On the Spine Match page, you will see the arrow that you selected and personalized in steps 1 and 2. You will also see a couple of frames of information from the My Setup page with information related to your bow specs, weight on string, arrow and fletching values. You can tweak the information in these fields to change the spine of the arrow you are using. For more information on arrow spine visit our arrow spine page.
The arrow that I selected from steps 1 and 2 appears to be too weak as indicated on the colorful spine graph. The indicator arrow is over the weak end of the graph. On the Spine frame (top center), in the comments box, the program has suggested alterations of my equipment in order to correct the spine of the selected shaft.
4. Dial in on the perfect archery arrow spine
By altering your equipment specs with the suggestions in the spine frame and then clicking recalculate, you will notice a change in the reading on the colorful spine graph. In some cases you can make a couple adjustments and achieve the perfect spine but in this case you will notice that in the results list there is an arrow that is perfect for my setup, the Quest Thumper.
For my setup (bow and archery arrow specs), the Quest Thumper is already a perfect match. It weighs in at 400.7 grains which is right at 5 grains per pound of draw (required for most bows to be under warranty) and shows the spine as being perfect. I also know that this arrow will fly at a speed around 339.5 FPS with 102.4 ft lbs of kinetic energy which is not too shabby!! I can now check the Export Arrow Info box, click the export all data icon just above the equipment tab, and then save this arrow to my User Record.
When using this method, you can eliminate “the wrong arrow” as being a factor in tuning. For more information on the software we used on this page visit http://www.pinwheelsoftware.com/.
So now you know how to select the perfect arrow, but how much should you spend? Is it worth it to spend the extra money for top shelf arrows? Is there a difference? Read below for our take on this issue.
Cheap Arrows vs Expensive Arrows
Often times I am asked what kind of arrows I prefer for whitetail deer, elk, mule deer, 3D, field archery events, indoor events, etc. My answers have returned many different responses. The response that inevitably leads to a lengthy discussion is “Man those are expensive; Why don’t you use cheap arrows?” Let me explain.
As we show on this website, there is a smart way to choose the best arrow for your particular setup; with archery software. Yes you can buy a cheap arrow and simply go off the chart on the box but you will be missing out on the benefits of a better performing arrow.
Differences between cheap arrows and expensive arrows
After inputting all of your specs into an archery program like OnTarget2, you will see the differences between cheap arrows and the higher quality pricy arrows. For instance, you can have two arrows that spine perfectly but have the following differences:
- Quality of materials is different – Cheap arrows will often be made of less consistent materials leading to arrows not flying the same.
- Weight differences – Cheap arrows will always be heavier per spine in comparison with more expensive arrows.
- Performance – This is the most important factor. An arrow that is made of higher quality material (straightness and durability) will perform better in the field. The more expensive and typically lighter arrow will also allow you more room for error when it comes to yardage estimating.
Conclusion on cheap arrows vs expensive arrows
Its worth it to spend the extra couple of dollars and purchase the more expensive, better performing arrows. They fly better, they fly faster, and they last longer. If you’re an archer who is trying to be the best you can be, spare no expenses. Never leave the potentially poor score or missed animal due to the fact that you saved $14.95 on a half dozen arrows.
Other useful facts on today’s archery arrow
Common weights of components
- 3/16″ diameter peep sight weight = 8 grains
- 1/4″ diameter peep sight weight = 10 grains
- D Loop weight = 6-8 grains
- brass string nocks = 5-7 grains
- Blazer vanes = 6 grains
What are grains?
Grains = the unit of measurement when weighing arrows and its components. a good electronic grain scale can be purchased off Ebay for under 10 dollars and is a nice item to have for the serious archer. Most manufacturers require you to shoot an archery arrow with a weight equal to 5 grains or more per pound of draw.
If you are shooting a 70 pound bow, then in order for the bow to be covered under most warranties, you must shoot an arrow (including tip) that weighs at least 350 grains. Too light of an arrow will not absorb enough of the energy of the bow and may result in the bow eventually failing due to the lack of an energy transfer.
Most current bows which are tuned can shoot an arrow as close as possible to the 5 grains per pound of draw rule and still have plenty of kinetic energy to kill a whitetail deer. When hunting bigger game, heavier arrows are preferred by some but speed is then sacrificed.
When choosing the length of the arrow, consider that the arrow should be at least a 1/2 inch forward of the arrow rest.
Summary on choosing the right archery arrow
Archery arrows are not cheap; if you want to buy an arrow with the proper spine and as close as possible to the 5 grains per pound requirement for maximum speed, access an archery program or someone who owns a program. Most quality pro shops will have one. Buy a 1/2 dozen to save on costs and shoot at different bullseyes on targets when practicing to ensure you do not damage your arrows. Robin Hoods (result of an arrow being shot into another arrow) are a nice conversation piece, but they can get expensive. Good luck!
