One skill that is paramount in bow hunting is knowing when and how to blood trail a wounded deer. Often times, hunters lose out on a trophy of a lifetime because they have rushed blood trailing deer or just didn’t have a good strategy. With our years of experience, we believe we have developed a great system that will increase your chances of recovering your deer.
Shot location and wait times
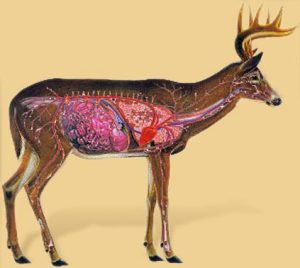
 The first two important things to determine is what part of the body the deer was shot in and how it ran off. Not knowing this information can result in premature searches and the pushing of wounded deer. Some shot locations result in a quick 5-10 second death while others require an 8 to 10 hour wait for the animal to expire. Let’s go through the different shot locations.
Heart shot
A heart shot will result in a quick death to the deer. After being shot in the heart, the deer will sometimes jump up and do a “mule kick” and then proceed to dart off at a blazing speed with its tail down. The blood from a heart shot deer should be a bright red and thick. The blood should spray out a nice pattern which is normally easy to follow. Heart shot deer make blood trailing deer easy in most cases.
Heart shot deer will rarely take the time to find a trail to use and will just choose a direction and go. If you listen closely after a heart shot, you will sometimes hear the deer crash through thick brush and even expire with a frenzy of kicks/twitches after hitting the ground.
If you suspect you shot a deer in the heart and did not see the animal go down, give the animal at least 30 minutes before blood trailing. Heart shot deer will typically run anywhere from 15 to 100 yards before dying.
Lung shot
The best place to aim at on a deer is the lungs just above the heart. If you are off your mark a little, chances are, you will still be in the vital area with your shot placement. Lung shot deer normally wont go very far and leave a frothy bright red blood trail. Sometimes, there will even be bubbles in the blood.
Lung shot deer will run off like a bat out of hell with their tail down just like a heart shot deer. They also will not take the time to follow an established deer path and will often dart through some thick vegetation.
After shooting a deer in the lungs we suggest waiting 30 minutes to 1 hour before looking for blood. A deer shot through both lungs will normally run 20 to 100 yards before dying. A deer that only has a partially clipped lung can live much longer and travel further, so treat a questionable lung shot as if it were a liver shot.
Liver shot
A liver shot is normally the result of a shot that was off its mark and rear of the vitals. Often times our aim is off, we took a shot at a walking deer, or we were fooled by the deer’s front foot placement. When a broadside deer’s front leg is back in its stance, the front portion of the vitals is covered. This leaves a small portion of lungs exposed and a shot that looked good at the time of impact actually may have hit rear of the lungs and hit the liver. When possible, wait for a deer to step forward with their front foot, exposing the vitals, before taking your shot.
The liver shot is a fatal shot but requires a much longer wait time than a lung or heart shot. Blood trailing deer after a liver shot is probably the trickiest of all hits. Many deer are pushed due to a premature recovery attempts with a liver shot deer.
A liver shot deer may take off at any pace, with its tail up or down, but will usually bed down after a short distance. If not disturbed, the deer will normally die at this location. The blood from a liver shot is more of a darker red/maroon and has a watery consistency. We suggest waiting 5-6 hours, if the weather permits, before blood trailing a liver shot deer.
Gut shot
Ah the dreaded gut shot….. When we are well off our mark and shoot a deer in the stomach/intestines area, we will hear a hollow thud. The deer may run or walk off in any fashion and will usually have their tail up.
The blood from a gut shot deer will have a brown to yellowish color and may have partially digested food matter in it. This blood normally will have a distinct raunchy odor. Due to a lack of arterial pressure, there may be much less blood left behind from a gut shot deer. Most gut shot deer experience septic or toxic shock and eventually die due to organ failure.
With gut shot deer we suggest waiting 8 to 10 hours before pursuing the blood trail.
After the shot
Here is a list of things to do after shooting a deer.
- Remember what body part of the deer was shot.
- Remember how the deer left after being shot. Was it running fast? Was its tail up or down?
- Listen closely so you can hear if the deer stopped, continued, or went down and started kicking.
- Mark the exact area where the deer was standing while being shot with an arrow or a photo. You can even shoot another arrow from the tree stand into the ground where the deer was standing to mark this. When you get down from the tree everything will look different so having a reference point is key.
- Stay in the tree until the time is right to get down so you do not spook the wounded deer. If you have to get down but are not ready to blood trail yet, sneak out the opposite way of where the deer went.
- When starting to follow the blood trail, mark either the first spot of blood or the spot the deer was shot in with a visual marker like toilet paper, orange ribbon, or a led lantern at night.
- Mark the initial location the deer was shot on a GPS device or your smartphone.
- Do not walk ahead of your findings to ensure you don’t destroy the blood trail.
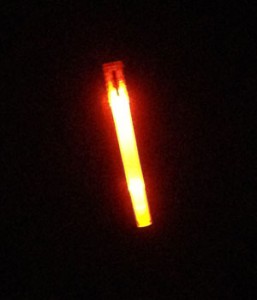
- As you follow the blood trail, leave visual markers (toilet paper, hanging led glow sticks, or drag a line with your feet) so you can look back and study the trajectory of the deer’s path.
- When on a blood trail, pause, squat, and look forward to discover if the wounded deer left clues. These clues may be a noticeable trail of broken weeds, branches, or fresh tracks.
- If you lose blood, start to fan out your search in case the deer changed direction.
- While on the blood trail, scan ahead often for the deer. If you see the deer, approach as if it is not dead. Look for the rise and fall of the chest cavity to indicate if it is breathing or not. If there are no signs of breathing, it is a good idea to poke it with a stick in the eye to ensure it is dead.
- If the deer is dead, do a victory dance and start field dressing!
What to have in your blood trailing deer kit

It is a necessity to have a good blood trailing deer kit. Fanny packs or back packs will allow hands free searching and have plenty of room for necessary equipment. The following is what we suggest you keep in your kit:
- short range and a long range flashlight or spot light
- back up flash lights
- field dressing equipment
- ty raps or wire ties for attaching your deer tag
- gallon zip lock bags for your used bloody field dressing knife and saw
- quart zip lock bags for the tarsal glands
- trail markers for periodically marking the blood trail (toilet paper, florescent ribbon, or led glow sticks for night trailing)
- a led lantern for marking beginning of the blood trail
- quality rubber gloves
- a rag or paper towels for minor cleanup
If you are prepared and fight the urge to prematurely find your deer, we think our system will help you in your recovery efforts. Below are some more blood trailing deer tips. Good luck!
Additional tips for blood trailing deer
- If you lose blood, get an experience dog on the trail. With 220 million scent receptors in their noses, an experienced hunting dog can register the scent of the blood off an arrow or some leaves and pick up the trail when our eyes fail us.
- If blood has ran out and you intend to do a grid search, search low lying areas and water sources. Mortally wounded deer often take the path of least resistance and often seek water to bed down in and for hydration.
- Save your money by avoiding expensive “blood lights” that use different colors to illuminate blood. They do not work well.
- Flashlights are the difference when blood trailing deer at night. Its a great idea to have flashlights for close range (minimum 160 lumens), long range (1,000 lumens), and a few backups in your blood trailing kit.
- Look 2 to 3 feet high on vegetation or weeds for blood that’s a result of direct contact with the impact area.
- Sometimes on a high hit, it will take time for the chest cavity to fill up with blood. Once the chest cavity is full of blood then blood will start spraying at a better rate. This means even though there is a poor blood trail for the first 50 yards, it doesn’t mean that it won’t get much better.
- When hydrogen peroxide is sprayed on blood, the blood will foam up. Although we have never used this technique, it may be an option during desperate times.
