Here is a list of 77 archery tips that will improve your accuracy and increase your effective shooting range exponentially! This list of archery tips can be applied for many different platforms of competitive archery including but not limited to: indoor target archery, 3D archery, and field archery. These tips are for people new to the sport of archery as well as experienced shooters.
If you take note and pick up a few pointers from these archery tips, you should see tighter groups and higher harvest rates if you’re a bowhunter. If you think this list can help others, please share on facebook, twitter, Google+ or blogs and don’t forget to visit and give our facebook page a like! Sharing our content is the appreciation that fuels our writing!
77 Archery Tips That Will Make You a Better Archer
- Know your equipment.
- If new to archery, do the research on the parts of a compound bow and their roles. You must be informed on your equipment if you’re going to master using it.
- Learn how to work on your own equipment.
- Give a man a fish, feed him for a day; teach him how to fish, feed him for a lifetime. That’s how you have to look at working on your own equipment. If you learn how to work on your equipment, you won’t be dependant on others. You also won’t have to take a gamble on whether your “bow technician” really knows what he or she is doing. Most all of your top archers work on their own equipment. Visit our Working on Equipment and Bow Tuning sections of our Archery 101 page for more information. *This is one of our favorite archery tips.
- Make sure your bow is to spec.
- Before you attempt to tune or shoot your bow, make sure it is where it should be spec wise. I have seen far too many bows that come straight from the factory “out of spec”. Many people trust companies too much and just start tweaking things. The bow manufacturer may have been in a hurry or it may have gotten “out of whack” during shipping. Check your bow’s specs.
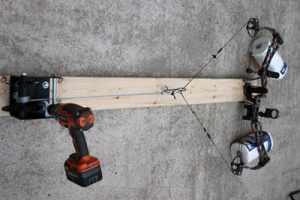
- Check your bow’s timing.
- This is oh-so critical with today’s aggressive cam designs. If your bow’s timing is off, you may be chasing your tail while trying to tune it. Invest in an archery draw board or make one for yourself to see if your bow’s timing is spot on.
- This is oh-so critical with today’s aggressive cam designs. If your bow’s timing is off, you may be chasing your tail while trying to tune it. Invest in an archery draw board or make one for yourself to see if your bow’s timing is spot on.
- Shoot an arrow with the proper spine for your bow.
- If you want optimal arrow flight, your arrow should be correcting itself as quickly as it can. This is where the perfect spine comes into play. Every bow demands a specific arrow spine. Shoot the right spine and your consistency will improve. Bypass the arrow spine charts and embrace a quality archery program to ensure you’re shooting an arrow with the correct spine.
- Always have an arrow nocked while drawing a bow.
- If you never have dry fired a bow and don’t plan on it, follow this tip. D-loops fail. Releases unexpectedly fire. Don’t be that guy. Have an arrow nocked and a safe place to aim that arrow. If you follow this tip, you shouldn’t have to worry about dry firing your bow. *Very important archery tip.
- Shoot the right draw length.
- This is a common problem with many archers regardless if they are new to archery or not. Shooting the wrong draw length will cripple your accuracy without a doubt. Visit our Finding your Draw Length page for more info.
- This is a common problem with many archers regardless if they are new to archery or not. Shooting the wrong draw length will cripple your accuracy without a doubt. Visit our Finding your Draw Length page for more info.
- Study your pin float for draw length analyzation.
- Watch your pin float to see what it tells you about your draw length. Historically, if your draw length is on the short side, you will have a tight, jerky pin pattern. If your draw length is a bit too long, the pins will have a slower and more sweeping pattern. Make the adjustments until you hit the sweet spot in your draw length. (credit to GRIV)
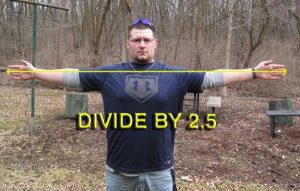
- Find your magic draw length and record it for future reference.
- When you find what draw length you shoot your best at, record your magic draw length. This is not the same as your manufacturer’s cam draw length setting. The magic draw length is the measurement from the throat of your bow’s grip to the nocking point on your string. No matter what bow you shoot in the future, if you get it set at your magic draw length, you be back at your most accurate draw length setting.
- Shoot a draw weight that allows you to have proper archery form.
- Being able to maintain proper form is essential if you want to shoot well. Some guys can shoot with great form at higher weight but some can’t. Being able to pull back 80 lbs doesn’t guarantee you be able to shoot with proper form at 80 lbs. Draw your bow back while being seating on a truck’s tailgate to see if you are comfortable at your draw weight.
- Set the third axis on your bow sight for incline and decline shooting accuracy.
- If this isn’t set properly, you could be headed for disaster when shooting uphill and downhill. Grab a level and a vice to see if your bow sight’s 3rd axis is set properly.
- Use your sight’s level while shooting.
- Failure to use your bow sight’s level on incline, decline, and long distance shots will send your arrow off target. If the 3rd axis is set on your bow sight, use the level while shooting!
- Learn how to yoke tune your bow.
- Solo-cams and many binary cam bows have yokes. Yokes are one of your best friends when it comes to super tuning your bow. Learn how to yoke tune to correct “uncorrectable” arrow flight problems.
- Paper tune your bow.
- Be cautious of the man that tells you that you don’t have to paper tune your bow. Paper tuning your bow is an important step of the super-tuning process. It’s not a solve all solution, but it does get you on the right track. It will ensure that your nocking point/d-loop and your arrow rest is in the right position. It will also let you know if you should do a little yoke tuning. If today’s flagship bows want to demand top dollar, they better be able to deliver a nice rip through paper without too many headaches. *Essential tip for archery tuning.
- Don’t stray too far from suggested centershot.
- While paper tuning your bow, don’t adjust your arrow rest too far from the manufacturer’s suggested center shot. Instead, yoke tune your bow or adjust the offset cable guard if your bow has one. If you have a binary cam system that doesn’t utilize yokes or an offset cable system, you may have to experiment with your cam shims.
- Walkback tune your bow.
- If your equipment is to spec, your paper tune is solid, then it’s time for a walkback tune. The walk back tune will fine tune your paper tune and ensure that your downrange arrows are not drifting to the left or the right. *This tip is crucial for long distance accuracy.
- Bareshaft tune your bow.
- A bareshaft arrow doesn’t have any “steering” fletchings installed. The arrow’s impact angle will give you an idea of how the arrow is leaving the bow. To bareshaft tune, start at 5 yards and work your way back as you tweek your bow for better results.
- Nock high impact means you may have to slow down your top cam by removing a twist from its cable. You can also experiment with moving your d-loop down a bit.
- Nock low? Slow down the bottom cam or adjust your d-loop up a bit.
- Shoot the same arrows.
- Don’t have a quiver of different shafts. This one really gets me. If you’re worried about accuracy, shoot arrows that have the same spine, same fletchings, are cut at the same length, and are the same weight. Any variations in your arrow will influence the point of impact.
- Cut off wobble while building arrows.
- While building arrows, use an arrow spinner to identify imperfections or wobbling sections of your arrows. When cutting your arrows, eliminate the wobble for a tighter range of arrow spines. (credit to Tim Gillingham)
- While building arrows, use an arrow spinner to identify imperfections or wobbling sections of your arrows. When cutting your arrows, eliminate the wobble for a tighter range of arrow spines. (credit to Tim Gillingham)
- Combine tip weight variations with shaft weight variation for a tighter range of arrow weights.
- When building arrows, use a grain scale to bring the average “built arrow weight range” closer to the same number. Pair light tip weights with heavier shafts and heavier tip weights with lighter shafts. If all over your completely built arrows are within a grain or so, your downrange accuracy should excellent. (credit to Tim Gillingham)
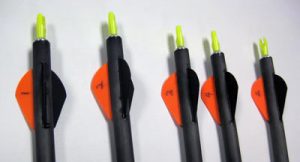
- Nock index your arrows.
- After your arrows are built, install some field points and do a paper tune. Once you get a consistent paper tune, shoot all of your arrows through the paper to see if all the rips match. If they do not all match, take your oddball ripping arrows and rotate the nock so that you use a different cock vane. By rotating the nock, you’ll change where the stiffest part of your arrow is located and therefore change your dynamic spine. You should be able to get all your arrows to have the same paper tune.
- Number your arrows.
- Eliminate poorly performing arrows by using a numbering system. If one of your arrows is consistently not grouping with the rest of the arrows, it may be time to give it a back seat in your quiver. *This is an important archery tip if you want to shoot your best scores.
- Eliminate poorly performing arrows by using a numbering system. If one of your arrows is consistently not grouping with the rest of the arrows, it may be time to give it a back seat in your quiver. *This is an important archery tip if you want to shoot your best scores.
- Watch your arrow flight.
- If you spot an abnormality with a specific arrow, investigate it further. You may have a rest clearance problem or you may have a fletching that is acting up.
- When sighting in your pins, move your pin toward your arrow’s point of impact.
- If you are dialing in your pins for the first time, first start off at 10 yards and take a shot at the bullseye. If you arrow hits left and low, move your pin or pins (gang adjustment) down and to the left. Chase your arrow. As you get your shot closer to the bullseye, your adjustments will become smaller. Once you are dialed in at 10 yards, move back and adjust your top pin for 20 yards (should be a small downward adjustment). Repeat process at 30, 40, 50 yards etc. depending on how many pins your sight has.
- Shoot lighter arrows for tighter pins.
- When yardage guesstimations are critical for scoring higher on the 3D course, why not have tighter pins? A lighter arrow will give you faster arrow speeds. Faster arrow speeds will give you tighter pins. Tighter pins will give you a little more room for error when guessing yardages.
- When shooting a lighter arrow, just make sure your arrow weight is at or above 5 grains per pound of your bow’s draw weight. Also make sure you are not exceeding any speed limit restrictions of the tournament that you are shooting.
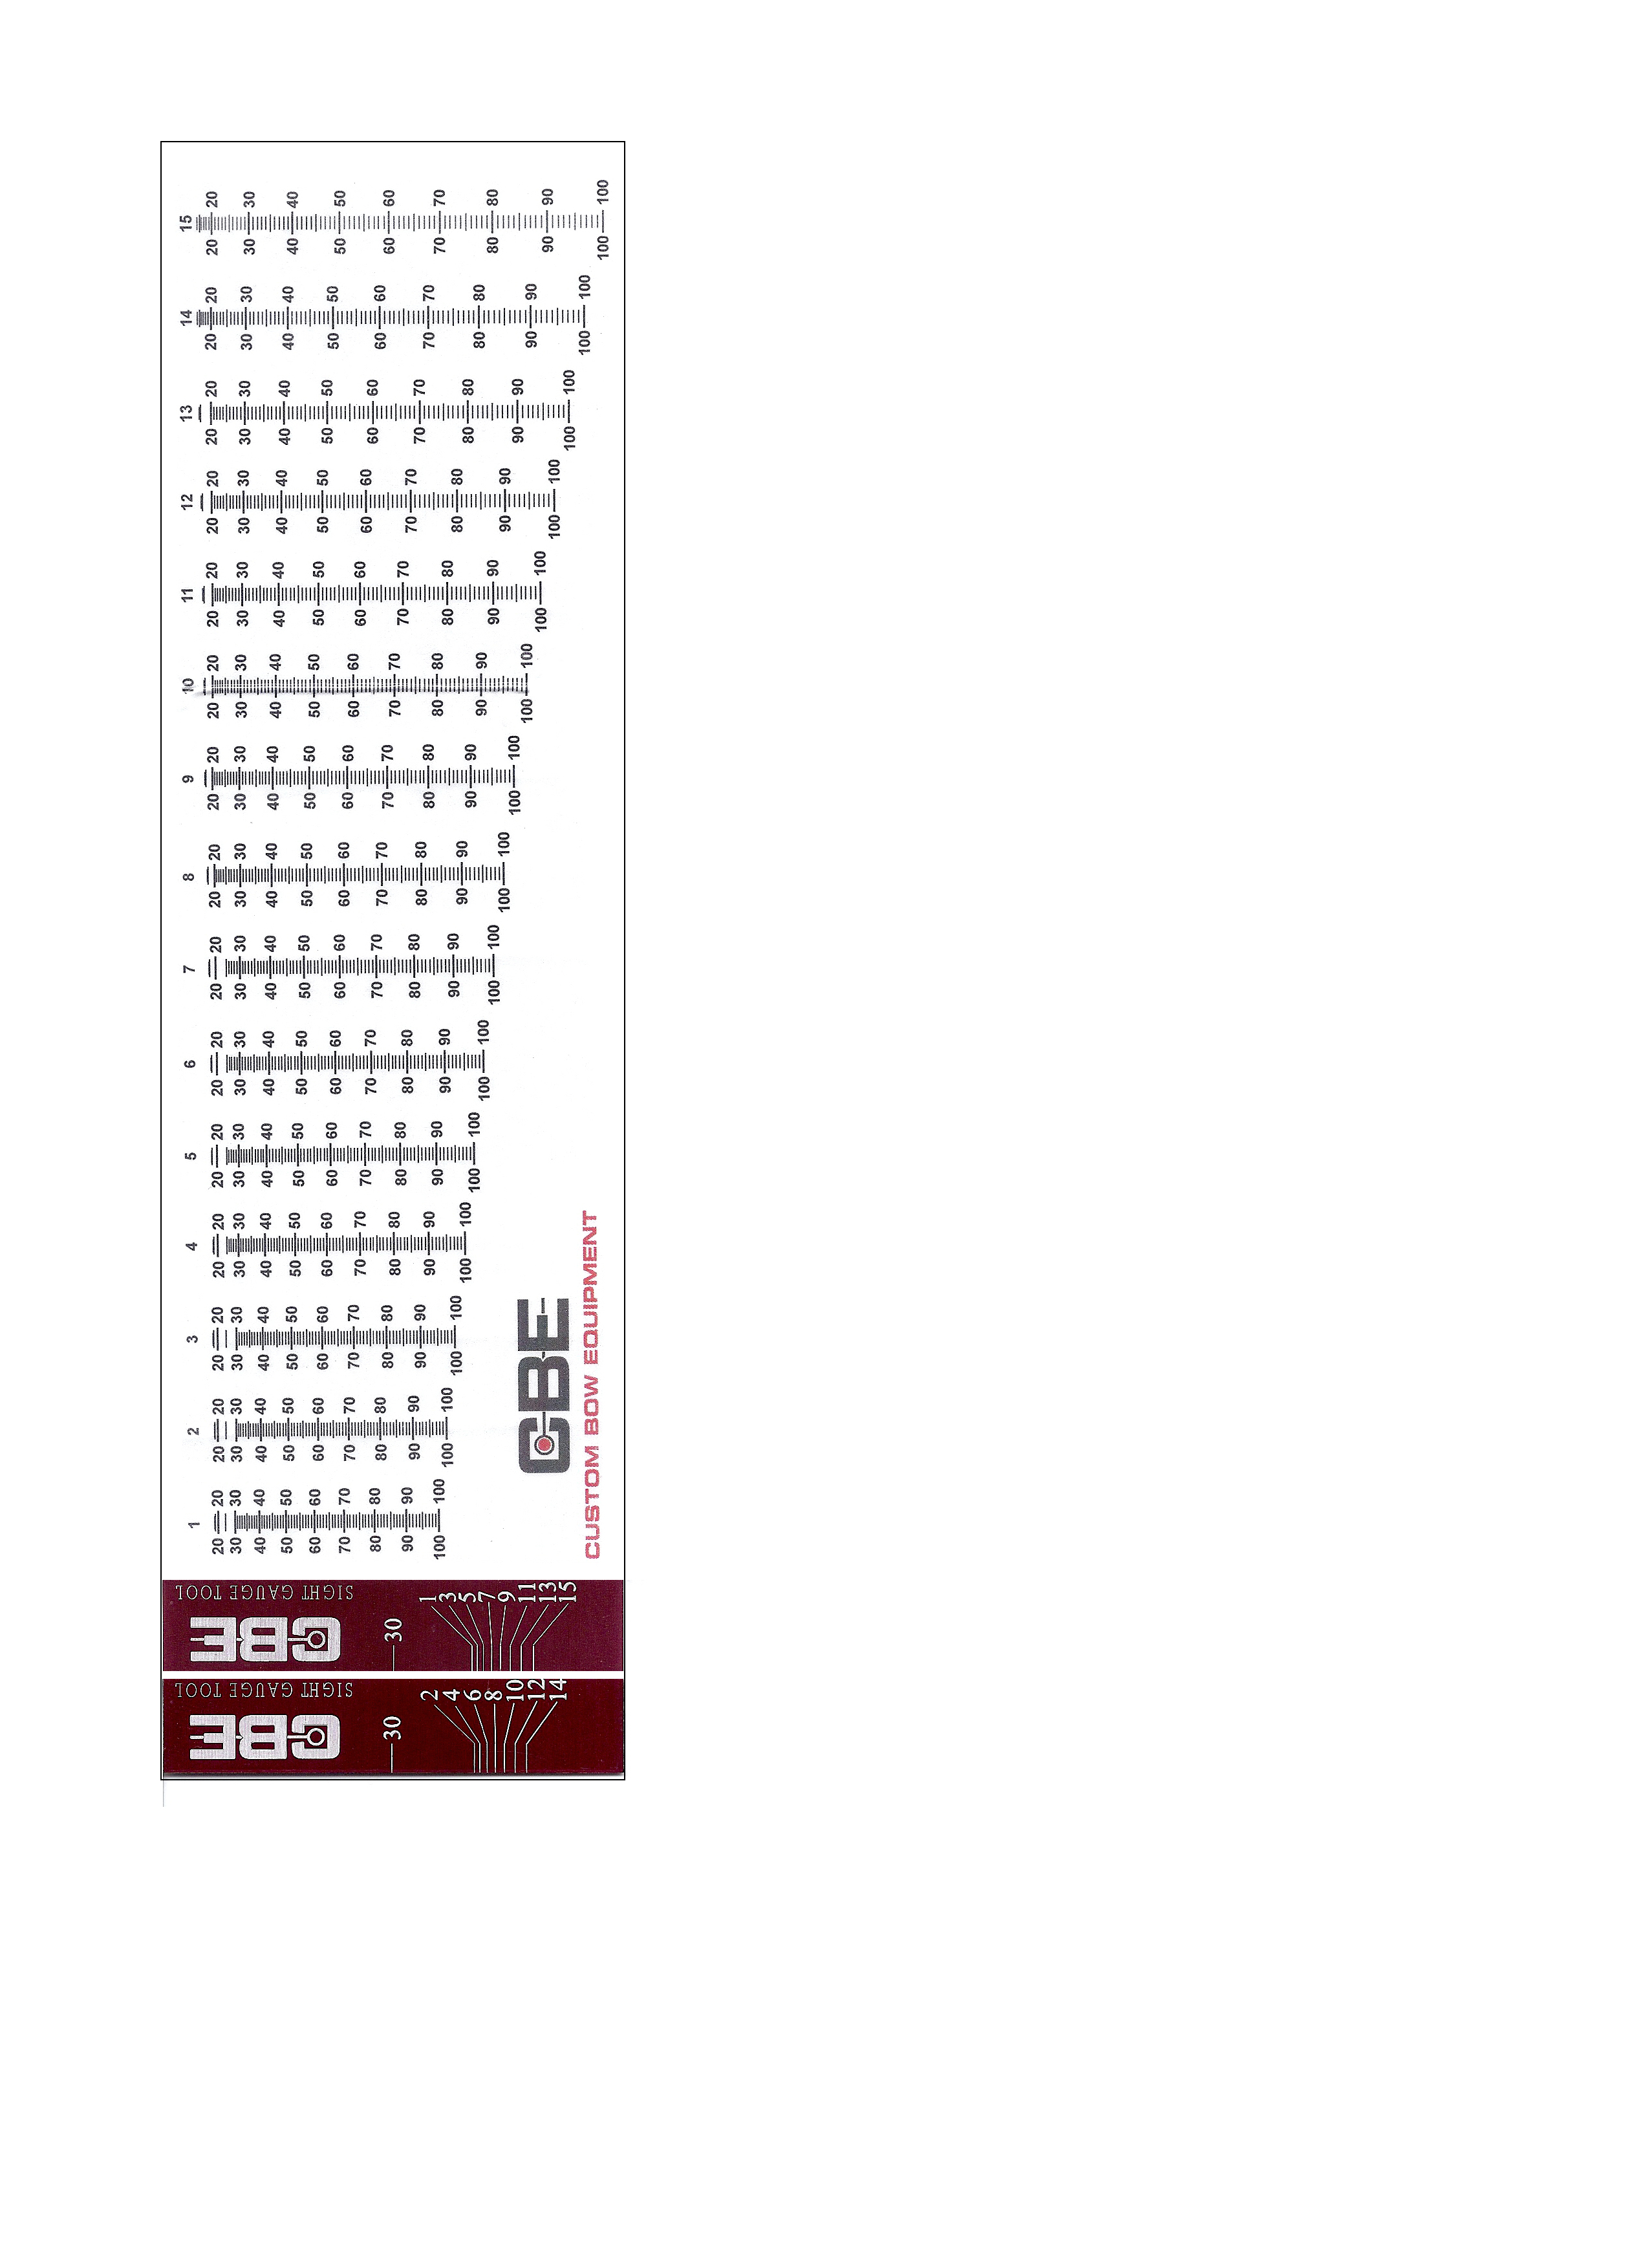
- Use a pin gapping tool for setting multi-pin sights.
- This is a big time saver if you shoot multi-pin archery sights. Simply dial in your bow’s 30 and 60 yard pins and use the tool for setting the rest of the pins. If you buy a Custom Bow Equipment archery sight, the tool and tapes are normally included. Click on the image for a full scale version.

- This is a big time saver if you shoot multi-pin archery sights. Simply dial in your bow’s 30 and 60 yard pins and use the tool for setting the rest of the pins. If you buy a Custom Bow Equipment archery sight, the tool and tapes are normally included. Click on the image for a full scale version.
- Ensure there aren’t any clearance issues with your drop away rest.
- One factor that can result in a porposing or fishtailing arrows is fletching interference with your drop away rest. If you are experiencing irregular arrow flight, check for rest interference by spraying the last 6 inches or so of your arrow with an aerosol foot powder. This will leave a film that will show when your drop away rest loses contact with your arrow.
- Another method is to line the outermost edges of your fletchings with lipstick. If your fletchings are hitting your drop away rest, you’ll see the lipstick on your rest.
- If you use a drop away rest, make sure it’s set right.
- When a drop away rest is set properly, it will come up at the last moment of your draw and won’t be putting any bend in the downward cable. If it is putting bend in your downward cable, it can throw off the timing and flight of your arrow.
- Use stabilizers to aid consistency and accuracy.
- Use a front stabilizer or a combination of front and rear/side stabilizers to aid aim-ability and deliver stabilization during your shot. Stabilizers absorb vibration, keep your bow balanced, and help the bow to stand up straight with less effort from the archer during a shot. Stabilizers also raise the bow’s moment of inertia or MOI which will allow for minor shot imperfections while still keeping your arrow’s point of impact where it counts. For a steadier hold and better accuracy, use stabilizers.
- Fine tune your bow’s mass weight for peak accuracy.
- If your pin is moving quickly and in an unpredictable pattern, your bow’s mass weight may be too light. If your pin is loosely floating around and fails to settle at the bullseye, your bow’s mass weight may be too heavy.
- Experiment with different let off settings.
- A compound bow’s let off setting will let you know how much holding weight you will have at full draw. The higher the let off, the fewer the pounds you’ll be holding at full draw. When you are holding fewer pounds at full draw, there is less demand on your body, but you will be able to torque the bow easier. Find out what works for you. Most professional shooters will shoot a let off of 65%.
- Forget bad arrows.
- This aspect of the mental game is key if you want to make the most of your next arrow. Beating yourself up over one bad arrow will often carry negative energy into your next shot. Use selective amnesia to forget that bad arrow and to start fresh with the next one.
- Shoot with your feet shoulder width apart.
- This is a rather simple tip, but an important one. With your feet shoulder’s width apart, you will have a stable base for the rest of your body.
- Adjust your stance based on your body’s natural point of aim.
- Your body has a natural point of aim. Using the method that can be found on our Archery Form page, you will find out exactly what type of stance you should use so your body is not fighting itself while settling on the target.
- Your body has a natural point of aim. Using the method that can be found on our Archery Form page, you will find out exactly what type of stance you should use so your body is not fighting itself while settling on the target.
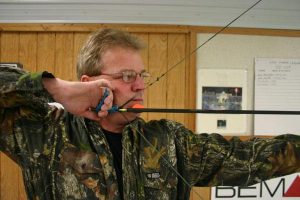
- Master a torque free grip.
- This is the most important tip of this entire list. From my experiences, if two people shoot the same bow and are consistently impacting in different spots or experiencing different rips while paper tuning, it’s the grip. Follow our instructions on our Proper Archery Form page for a great example of how to use a torque from grip on your bow. *This is probably the most important archery tip in this list.

- This is the most important tip of this entire list. From my experiences, if two people shoot the same bow and are consistently impacting in different spots or experiencing different rips while paper tuning, it’s the grip. Follow our instructions on our Proper Archery Form page for a great example of how to use a torque from grip on your bow. *This is probably the most important archery tip in this list.
- Establish good anchor points.
- When you’re anchored properly, you’re stable. When you’re stable, your consistent. When you’re consistent, you score well in archery. Learn about anchoring properly by visiting our Proper Archery Form page.
- When you’re anchored properly, you’re stable. When you’re stable, your consistent. When you’re consistent, you score well in archery. Learn about anchoring properly by visiting our Proper Archery Form page.
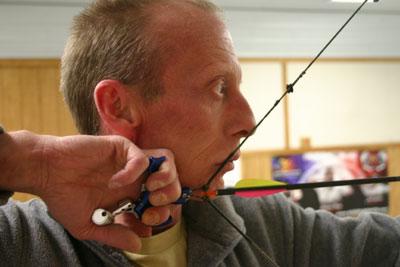
- Watch your face contact with the string.
- String contact with the face should be very light; while anchoring to the face, move the string to the face and not the face to the string. Inconsistent face pressure on the string will affect an arrow’s point of impact. (credit to GRIV)
- Make sure your peep sight is set properly.
- One of the keys with archery form is having your body not fight itself while executing a shot. If your peep sight is installed at the right spot on your bowstring, anchoring to the string will feel natural and you’ll be able to maintain good form without moving your face up and down your string.
- One of the keys with archery form is having your body not fight itself while executing a shot. If your peep sight is installed at the right spot on your bowstring, anchoring to the string will feel natural and you’ll be able to maintain good form without moving your face up and down your string.
- Make sure your bow sling isn’t too tight.
- This is common with many new archers. The have the bow sling set too tight. This can add to holding hand torque while shooting a bow. You want to set the bow sling loose enough to where it is not applying any pressure to your holding wrist.
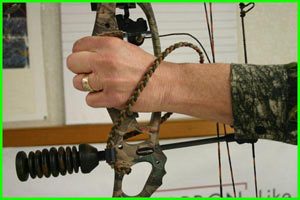
- This is common with many new archers. The have the bow sling set too tight. This can add to holding hand torque while shooting a bow. You want to set the bow sling loose enough to where it is not applying any pressure to your holding wrist.
- Pull on your wrist style release’s trigger with the right part of your finger.
- By placing your trigger between your first and second knuckle, you will be able to slowly activate the trigger while pulling it straight back from the bow. Try not to use the tip of your finger by “plucking the banjo string.”

- By placing your trigger between your first and second knuckle, you will be able to slowly activate the trigger while pulling it straight back from the bow. Try not to use the tip of your finger by “plucking the banjo string.”
- Learn how to aim and release the arrow the right way.
- Focus on both the pin and the target at the same time, slowly stabilizing its drift as you execute your release. If your draw length is set properly and you are executing proper back tension, your pin will hover around the “x” allowing for a perfect surprise release.
- Work on firing your bow around 5 seconds after you draw.
- As you get your shooting rhythm down, you’ll notice how long it takes you to pull off your ideal shot. This is around 5 seconds on average for professionals. Observe and record yours. If you are struggling with your aim and go beyond your ideal shot execution time, let down and draw again.
- Use proper back tension while shooting your bow.
- Your strong back muscles are the stable muscles you want to call on while delivering your shot. While your drawing and holding arms and hands are critical elements of form, proper use of your back muscles will stabilize and aid in pulling off the perfect shot. Engage your back muscles for contractions that will pull your holding elbow straight back resulting in a stable and linear shot.
- Align your body’s skeletal system with the path of the arrow.
- Drawing and firing a bow is a linear force activity that requires proper body alignment. Your release arm’s elbow should be directly behind the arrow. If your alignment is off, you may notice a twist in your bow’s orientation after you fire your shot. Have an archery coach critique your form.
- Have a slight bend in your holding elbow.
- This will reduce pushing arrows to the side of the holding arm due to that arm acting as a shock absorber. It will also eliminate string slaps to the forearm.
- Hold firm while being relaxed while shooting.
- Focus on executing your back muscles during the shot while letting other body parts such as your holding and drawing hand go somewhat limp. The more relaxed your body is, the less of a split second torque during the shot. *This is a crucial tip for executing a proper shot.
- Develop a shooting routine/cadence.
- The flow of events of your shot is something you want to establish and repeat time after time. Your routine should be the same every time you shoot. Components of your routine or cadence can be: stance, grip, load, breathe, draw, anchor, breathe, shot, and follow through. Find out what works for you and repeat, repeat, repeat.
- Control your breathing.
- Your brain needs oxygen so it is important to not hold your breath for an extended period of time. Breath normally, inhale while drawing your bow, and slowly exhale while zeroing in on your target. After your “zeroing in breath”, you will remain neutral with your breathing until the shot has been taken. This is because, during a breath, your diaphragm creates movement and disrupts aiming.
- Master your drawing shoulder.
- Lower your drawing shoulder after you’ve achieved full draw. When we draw, sometimes our drawing shoulder remains higher than the holding shoulder. This will cause inconsistencies with your vertical points of impact. If you relax your holding shoulder’s muscles and let the shoulder sink back down into position, you will no longer be fighting your body while aiming and the vertical impacts of your arrow should tighten. (credit to GRIV)
- Master your holding shoulder.
- During the draw cycle, sometimes archers will raise their holding shoulder while they are raising their bow for the draw. At full draw, the holding shoulder may get stuck in this position and ultimately affect accuracy. To alleviate this, while loading pressure on the bow, push downward and forward with your holding shoulder, and raise your arm while drawing. This will ensure that your shoulder will stay in its natural position during the shot execution resulting in more consistent shooting. (credit to GRIV)
- Let your holding hand stretch while shooting a hinge.
- Let your palm get longer during the shot while using a hinge/back tension release for consistency during shot execution. This technique can be used with a thumb activated release as well; while the release hand is relaxing and “stretching” during the shot, the thumb will move and activate the trigger. (credit to GRIV)
- If you shoot a wrist style release, adjust the trigger pull for better results.
- The trigger pull of a release at full draw is different than the trigger pull of the trigger while the bow is in the static position. Too much required trigger pull can lead to inconsistencies in shot execution and arrow flight. Adjust your trigger pull to a very light, yet stable setting for a torque free shot.
- Don’t time your release/don’t punch the trigger.
- Punching the trigger the second the pin hits the bullseye is often how beginning archers first achieve accuracy and success. Although initially effective, it is a bad habit that resorts to “timing” instead of proper form.
- Follow through properly.
- After executing the shot, you should maintain your holding hand on the target while your arrow impacts the target. Avoid dropping your bow out of the way to get a sneak peak at where your arrow hit. Failure to do so may result in low points of impact with your arrows.
- Do some blank bale shooting.
- When times get tough and your arrows aren’t cooperating, resort to some blank bale shooting. Blank bale shooting is where you bring it into about 10 yards and just fire at a blank target wall. All you want to do if focus on your form. This is a great opportunity to have someone critique your shot execution and form. You can often reset yourself back to proper archery form with this exercise.
- Hire an archery coach or seek advice from an experienced shooter.
- If you want to develop proper form and embed that form into your muscle memory, have a good coach get you on the right path. Nothing is worse than developing and strengthening bad habits through thousands of shots. Have someone show you the right way to shoot and hardwire that proper form into your brain through practice.
- Watch videos and model yourself after the pros.
- Study what works for the professionals. How are they anchoring? What does their follow through look like? How long does it take them to get off a shot? How are their stabilizers set up? By observing, you may be able to pick up some differences that you can work on.
- Stay in peak physical condition.
- Work your entire body. Work your legs for a strong base. Work your core/abs to lesson the load on your back and work your arms and shoulders so you’ll hold your draw with ease. Develop a routine that strengthens your body as a whole.
- Warm up/stretch before shooting.
- Our bodies go through a lot during work and other daily tasks; muscles get tight and sore. To eliminate injury and to boost your performance, stretch and warm up prior to shooting. It doesn’t take long and is a suggested activity to prevent injuries.
- Visualize your shot.
- You can’t have success in archery without a strong mental game. Positive visualizations can help you to drill the “x”. I remember shooting a five spot NFAA 300 round in which I just happened to drill out the “x” with my first 3 arrows. It made a nice single hole. When it came to that upper right spot, I just knew I would “inside-out” that sucker and I did for pretty much the whole round. The continual pounding of that hole helped me to visualize success for every shot time and time again. It worked!
- Practice, practice, practice.
- After developing proper archery form and getting your equipment dialed in, practice often. Every time you practice, you will strengthen your muscle memory and mental connection to proper shot execution. Do it often enough and it will be harder to slip up during shoots.
- Shoot from many different positions.
- This means kneeling, seated, with your feet planted awkwardly, etc. This will force you to strengthen you body parts that you still have control over to make the shot. This is beneficial when on the 3D course or while hunting when the optimal footing/stance is not available.
- Go long or go home.
- If you have your archery form and equipment in order and can achieve tight groups at 20, 30 and 40 yards, keep conquering longer yardages. Beyond 30 yards, your arrow (in most cases) has achieved perfect flight and you may be surprised how far you are capable of shooting. Imagine the confidence you could have if you can consistently hit a frisbee at 80 yards or longer.
- Avoid alcohol the day night before shooting.
- Hangovers, whether major or minor, will affect your body’s ability to consistently dot the bullseye. While hungover, your body will have a higher level of cortisol which leads to improper stress responses, altered metabolism, and mental state. You don’t need the check engine light on while trying to shoot your best.
- Avoid nicotine while shooting.
- Nicotine raises your heart rate and constricts your blood vessels making it harder to relax for proper shots. Although some people shoot well with nicotine in their system, the general consensus is that it limits potential.
- Watch the caffeine and energy drinks.
- Too much caffeine causes an increased heart rate which can lead to minor tremors and even heart palpitations. Being “wired” will make it difficult to hold as steady as you should be able to.
- Keep a shooter’s diary.
- If your life is worth living, it’s worth recording. The same is true with your shooting rounds at the range. By being able to reflect back on your progress, you will be able to identify factors that may have lead to poor or excellent scores at the range.Record the following when you shoot:
- How you feel. Did you rest well? Are your muscles sore? Are you stressed out?
- The temperature or other uncontrollable factors.
- Your equipment specs: draw length, draw weight, arrow info.
- Your scores.
- If your life is worth living, it’s worth recording. The same is true with your shooting rounds at the range. By being able to reflect back on your progress, you will be able to identify factors that may have lead to poor or excellent scores at the range.Record the following when you shoot:
- Take a break when you need to.
- We have all been there; shoot a thousand arrows in one hour and wonder why you can’t hit the “x” consistently. Your mind is so focused on being the best that it has not realized that your body has had it. Instead of messing with your equipment, take a break and revisit your issues when you’re rested to see if the problem hasn’t solved itself.
- Learn how to estimate yardage using your memory.
- When competitive archery takes you to a 3D course and it’s up to you to estimate yardages, use your memory. When we engage in a physical activity, our brain links up with our muscles and registers all events. Take baseball for example. We you ever a pitcher or a catcher? If so, the mound is 60 feet, 6 inches from home plate. That’s 20 yards! Picture where the catcher would be if you were about to pitch. For all you catchers, home plate to second base is about 42 yards.
- For longer distances, you’ll find a maximum range for throwing a football. If you play catch with someone long enough, you’ll know just by looking where your maximum football throwing range is. For shorter distances, use other memories. A bean bag game or cornhole game is exactly 10 yards from hole to hole. Horseshoe stakes are 13 yards apart.
- Use a combination of the methods above to get your yardage guesstimations within a yard or two.
- *This is a great tip for getting your yardage guesstimations dialed in.
- Carry your rangefinder with you for random yardage testing.
- By having your rangefinder with you during an average day, you’ll be able to test your yardage guesstimations randomly. How far is the pro desk from the tool department at your favorite hardware store? Take a guess and then range it. How deep is your vehicle in the parking lot? Guess and range. The more your test your skills, the better they will develop.
- Video tape yourself for self-analysis.
- We all pretty much have smartphones now that are capable of taking excellent resolution and surprisingly high frame rate slow motion. Set up or have someone hold your “video camera” to get a video that you can review later or send to someone over the internet for analysis.
- See the optometrist.
- This is pretty basic right? Not really. Many people who spend their teenage years with perfect vision fail to see the eye doctor when their vision starts to get worse. Our eyes don’t go from perfect 20/20 vision to legally blind overnight so a gradual worsening of clarity and sharpness may go unnoticed. Every year you should get an eye exam to make sure your eyes aren’t working against your archery success.
- Aim small, miss small.
- It’s easier to hit the center of a golf ball than it is to hit the center of a basketball. With this in mind, when you are sighting in your pins, don’t shoot at a large bullseye target; instead, take a Sharpie marker and make a small solid black dot on a white target background. If you have a black background, use a white piece of tape to make the spot you’ll shoot for. These dots will allow you to eliminate “visual background noise” and focus on putting one pin on one spot. If you want to get creative and miss hunting season, you can follow our lead in the image below, lol. *This is a great tip for speeding up the dialing in of your pins.
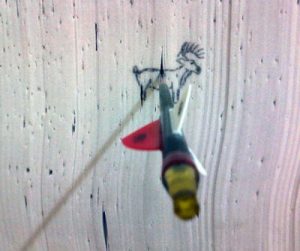
- It’s easier to hit the center of a golf ball than it is to hit the center of a basketball. With this in mind, when you are sighting in your pins, don’t shoot at a large bullseye target; instead, take a Sharpie marker and make a small solid black dot on a white target background. If you have a black background, use a white piece of tape to make the spot you’ll shoot for. These dots will allow you to eliminate “visual background noise” and focus on putting one pin on one spot. If you want to get creative and miss hunting season, you can follow our lead in the image below, lol. *This is a great tip for speeding up the dialing in of your pins.
- Use a chronograph to ensure your pins will be dialed in.
- I think we have all been there. We go to the range and painstakingly dial in every one of our pins only to find out that 2 weeks later, the pins are off. What happened? Did our pins get knocked off in transit? Why, why, why!! Well, maybe, your string stretched, creep set in and now your bow is shooting a little slower of an arrow. This happens, especially with new bows that haven’t had their strings through a couple hundred shots.
- To keep an eye on our “bow’s health” you should not only record brace height and axle to axle measurements, but you should also record your arrow’s speed. I can tell you that my bow is sighted in for my arrows flying at 319 FPS. Before I shoot, I will shoot through my chronograph to make sure it is hitting that speed. If it is a foot per second or two slower, I will tweek my bow to get it back to 319 FPS or I will struggle at the range or competition. *This is a critical tip that should be done before every shoot.

- Avoid drawing back compound bows with your bare hand to avoid string derailment.
- I have witnessed this in person at an ATA Show and on a few videos. When you draw back today’s aggressive short axle bows, a little holding hand torque along with a drawing hand that takes a string out of “it’s line” can be the recipe for derailment. To avoid potential derailments of bowstrings, use a release.
- Keep your hands out of the line of fire while a bow is at full draw.
- You may think you’re doing someone a favor by pointing something out while they are at full draw, but you never really know when that bow is going to fire. I witnessed this in person at my local archery club. A husband was plumbing up his wife’s bow while she was at full draw and bam! The wife shot and the cam caught his thumb, ripping off the entire nail. Stay out of the line of fire.
- Keep archery fun.
- Don’t let the competition and striving for perfection take away from your enjoyment of archery. If you’re getting burnt out, force yourself to take a break or change things up to take the stress off yourself. I’ll take the recurve out from time to time to add a little variety and to remind myself of when I first started shooting. Bottom line, have fun.
Summary of our 77 Archery Tips
We hope you had a few positive takeaways from this mega article! We may have missed a few things, but we tried our hardest to cover as much as we could. I would thank archery ambassadors like Tim Gillingham and George Ryals (GRIV) who have helped me and so many others throughout the years by sharing their archery knowledge.
If you enjoyed these archery tips, please share with others and don’t forget to check out the rest of our website for more tips on archery and hunting. Thanks for reading.